Review the following article on how to configure the EMS client.
Overview
This article will cover the functions of the EMS Client and how to complete its setup. The EMS Client comes as an optional installation during the Linkly Software installer. It is a lightweight program and is commonly used by customers to keep a record of receipts and transactions performed on the POS.
Can’t find your answer? Feel free to contact us at support@linkly.com.au We’re here to help make the process as easy as possible.
EMS Client Setup
The EMS Interface
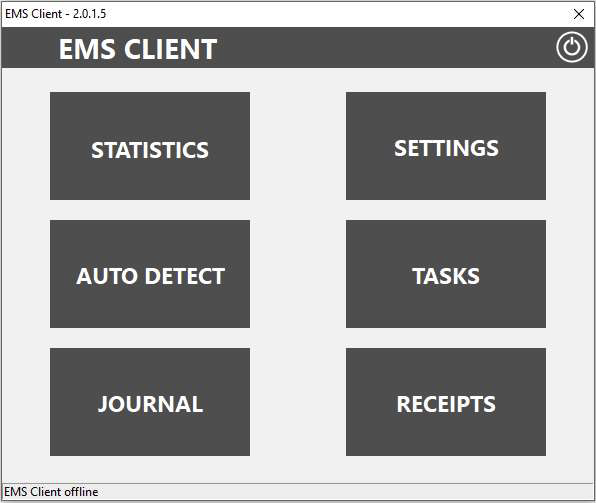
Auto Detect
The AUTO DETECT button will allow you to detect EFT-Servers on the network and eftpos terminals connected to the POS.

NOTES:
- AUTO DETECT will restart both the Linkly Client and EFT-Server.
- AUTO DETECT may require administration privileges to run.
- AUTO DETECT may not detect an EFT-Server or correctly functioning PINPAD. If AUTO DETECT is not detecting a terminal, it does not mean the terminal is faulty or configured incorrectly. If it is not detecting an EFT-Server, it does not mean the EFT-Server is inaccessible.
AUTO DETECT HELPS DETECT THE FOLLOWING:
| Peripheral | Expected Result |
| Pinpad |
Any correctly configured terminals attached to the POS (if configured for serial correctly, the auto detect will show which COM Port the terminal will be using. Similarly, it will show the COM port the USB device is using) |
| EFT-Server |
AUTO DETECT can show any EFT-Servers hosting a connection to the Gateway. AUTO DETECT will search PORT 2005 for any active EFT-Servers. |
| P66 Modem |
An old "Legacy" way to form a connection to the gateway. If a P66 Modem is in use, it will be detected. |
| EMS-Server |
An old software that was previously supplied and supported by Linkly. The Software was discontinued at the end of 2017. The Software is no longer officially supported by Linkly, only very limited basic support can be provided, it is expected for the customer or their IT to support it if they wish to continue using it. |
Tasks
The TASKS button will open the TASKS window. Here you can set up a "task" that the EMS Client can request the Terminal to perform.
NOTES:
USING TASKS, YOU CAN SETUP THE TERMINAL TO PERFORM THE FOLLOWING:
- An Automatic Settlement,
- a pre-settlement and
- a printout of the Shift Totals generated by the journal and a summary or Transaction Listings (please note, not all report types are supported by all banks).
Auto Settle


An Automatic settlement uses the AUTOSETTLE application. This is installed in the location where Linkly has been installed (By default C:\Program Files (x86)\PC_EFT. If you examine the exec field in the tasks window, you can see where the task is going to look for the AUTOSETTLE application.
If this is pointing to the wrong location, Delete the Task and recreate it, the path should be automatically corrected.
(Either C:\PC_EFT or C:\Program Files (x86)\PC_EFT)
Clicking Add Auto Settle will open the Add Auto Settle Window.
Time to Auto Settle:
Here you can Adjust the Time of when the Automatic Settlement should occur each day. Ticking the Prompt for Retry box will set the EMS Client to perform the Automatic settlement again until successful
Settlement Type:
You can Adjust the Settlement Type By choosing the desired option in the Settlement Type section (not all Types are supported by all banks).
Receipt Printing:
Here you can select how you would like the Automatic Settlement to print. If printing using the EFT-Client, the Printer field in the Client will have to be set to either the Internal Terminal printer (NPT) or to a local printer attached to the POS.
After making Changes, click the ACCEPT Button. The Automatic settlement you have setup will now be visible on the TASKS Window.
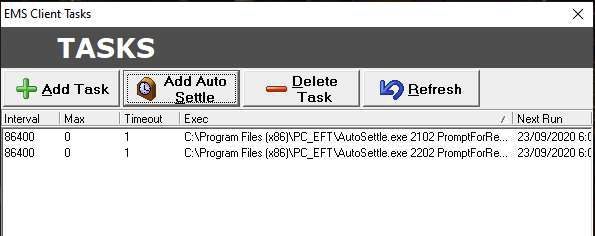
In the Exec field of the Tasks window, once a task has been setup it will be issued a specific code for the parameters of the task. For example, a task with the code 2102 is a Settlement set to print a receipt using the EFT-Client.
Below is a list of codes for all task types.

NOTES:
Only one settlement can be performed every 24 hours. Attempting another settlement within that time will result in the response "97 ALREADY SETTLED" or "SETTLEMENT NOT AVAILABLE".
You will be required to wait until the next scheduled settlement time.
Journal & Receipts
These buttons will open the PCEFTPOSJnlRcpViewer (Located in the default installation directory). This allows you to see a record of all transactions and receipts performed on the POS with an integrated eftpos terminal since the installation of Linkly was performed. Both the Receipt and Journal buttons will open the PCEFTPOSJnlRcpViewer.

PCEFTPOSJnlRcpViewer Journal tab
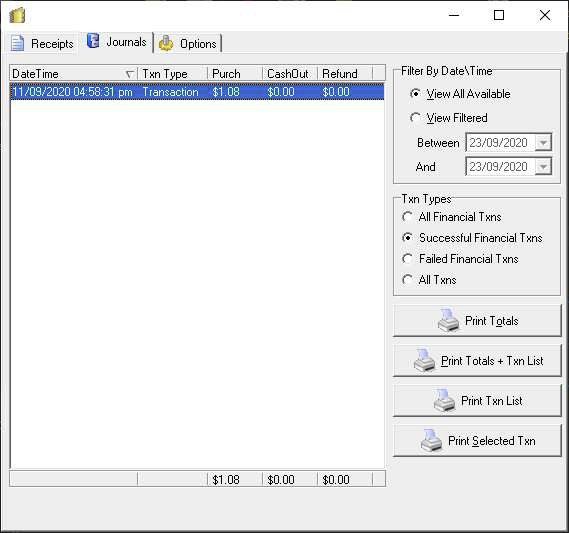
The Journals tab of the PCEFTPOSJnlRcpViewer shows all transactions performed on the POS that have been recorded by the Client in the EFTPOS.EJL file. This will not show all the information of the transaction, only partial card data and card information (Type, Expiry, etc) the value of the transaction and the status of the transaction (failed, successful)
All transaction(s) for the selected date will also add to the total amount at the bottom of the Journal window, this can be a quick way to see your totals for a specific time period.
The area labelled Filter By Date\Time allows you to select and view all journaled transactions or chose a specific time period using the "Between" and "And" dropdown boxes.
You can also select the Transaction Type (labelled Txn Types) you would like to view. These options include financial transaction, successful transactions, failed transactions and all transactions. (non financial transactions include Settlements, and logons)
PCEFTPOSJnlRcpViewer Receipts tab
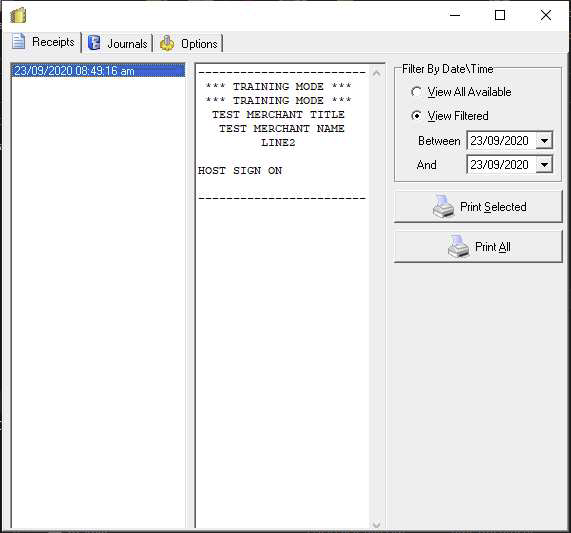
The Receipts tab of the PCEFTPOSJnlRcpViewer shows a record of all receipts stored by the Client since the installation of Linkly.
The Receipt tab draws the information from the RECEIPT.RCP files in the following location C:\PC_EFT > EFTPOS.RCP and C:\PC_EFT\Receipt
The receipt will be displayed in the centre dialogue box.
The area labelled Filter By Date\Time allows you to View all available Receipts or filter to a specific timeframe using the "Between" and "And" drop down boxes.
You can choose to print the selected receipt (highlighted in blue on the left) or print all receipts from your specified timeframe.
Options
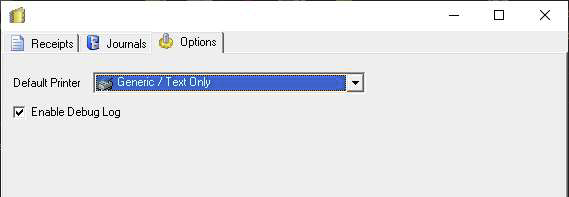
Here you can choose the printer you would like the PCEFTPOSJnlRcpViewer to print to. You can select the printer from the dropdown box. To set a printer as default, see below.
You can also enable a Debug log to generate for the PCEFTPOSJnlRcpViewer by ticking the 'Enable Debug Log' tick box.

The Default Printer option is accessed via the SETTINGS button in the EMS Client. Due to the EMS Server no longer being supported by Linkly, almost all information on the page is irrelevant. The only setting that should be altered is the Default Printer. Do not change any other settings on this page.
Selecting the Default Printer will set the PCEFTPOSJnlRcpViewers Default Printer.
You do not need to hit APPLY after changing the default printer.